| To create a headline text
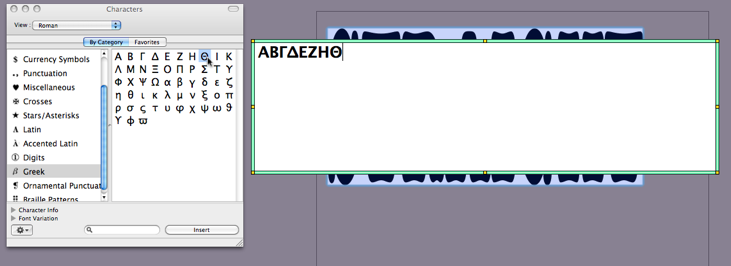
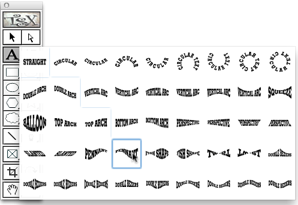
object: 1. Click the Text tool in the tool palette. 2. Select a starting corner for the text box, and then click and drag to grow it diagonally outward, as large as you desire. This defines the area that the text object is to occupy, and opens the Text Attributes dialog box. When you release the mouse button, the Text entry window opens. The name of of the current shape is the default text within the Text entry window. Highlight the current content and replace it with your message. Once you've entered your message click outside of the Text entry window and your message appears on your work page. To use the Text entry window you must either select or create a text object. After you use the Text tool to grow a new text box, releasing the mouse automatically brings up the Text entry window. For an existing object, first select the object, then choose Edit Text... from the Edit menu, or type Command-T. The easiest way to access the Text entry widow is to double-click with the Pointer tool on a text object itself or click. Selecting a Font You can select a font for your object either while in the Text entry window or from the main screen using the Font menu or the Fonts panel. The font menu displays all the currently installed and available fonts. As you scroll through the fonts a preview of the actual typeface is presented. The Fonts panel also displays the the installed fonts and the current selected font of the object. While in the Text entry window the Fonts panel lets you specify the point size of your message in the text entry window. Using the Fonts panel also lets you use different fonts within your message. Entering Special Characters Sometimes your message needs to contain characters that are available to be typed directly from the keyboard. These characters are entered using the Characters panel. Click on Characters from the tool bar to open the Characters panels. Either create a new headline text object or use and an existing object to enter the Text entry window. Using the Characters panel locate the character or characters that you desire and double click on each desired character to have it be entered into the Text Entry window.  Selecting a Type Style Any of the fonts available to TypeStyler can be customized to alter its appearance.. TypeStyler includes many ready made styles to choose from. These ready made styles can be accessed from the Style menu located in the menu bar or from the Style Library which is accessed from clicking on Styles in the Tool bar. To customize an existing style, or create your own, click Style Workshop… to open the Style Workshop. The Style Workshop is fully described in " Using the Style Workshop [108]." Selecting a Type Shape You can make any type fit into a circular shape, a twist shape, or any of the shapes available in the Shape Library. The 45 popular shapes provided are really just a starting point, since you can freely customize them all. The basic shapes are mathematically perfect (for example, a 90° right angle, a 90° arc, a perfectly round circle). Clicking on Distortions from the Tool Bar opens a palette that contains the 45 shapes. You can also use the Shape Library pulldown menu, as you scroll through the styles a preview of the highlighted shape will appear in the Shape Library window. If you know a shape you are going to want your headline text object you can choose that shape when selecting the headline text tool from the Tool palette. Holding down the mouse button while clicking on the "A" will reveal a palette of the 45 shapes. Choose one of them and then click and drag to grow your object. After entering your message in the text entry are and clicking outside of the widow your object will be in your chosen shape.  Entering Text Once you have selected a font, shape, and style, you may enter and edit type in the text entry area. In fact, you can enter text as soon as you open the Text entry window and if you want, edit text anytime between styling and shaping, whenever you enter the Text entry window of your object. The blinking cursor indicates the insertion point where your typing appears. If your text extends past the right edge of the text entry area, TypeStyler scrolls to the right so that you can see what you're typing. Press the return key to start another line, and press the space bar to indent. There is a 255-character limit on text entry in one text object, including spaces and returns. While you can create fairly lengthy text objects, keep in mind that TypeStyler is not a word processor. Unless you need the special features of TypeStyler headline text, enter large blocks of text using TypeStyler's body text (container text) , then combine it with TypeStyler's styled type. When you've finished entering your text, click outside of the Text entry widow to return to the main screen. Editing Text TypeStyler's documents are composed of graphic objects that are normally (in drawing programs, for example) very different from word processing text characters. A unique feature of TypeStyler is that it can read its flexible text objects, permitting you to edit them as if they were ordinary text. You edit text objects in the Text Entry window. To enter the Text entry window, you can use the Pointer tool to double-click the text object, select the object and then select Edit Text... in the Edit menu (or type Command-T . In the Text entry window, you can use standard Macintosh editing techniques (on selected text only), including the Cut (Command-X), Copy (Command-C), and Paste (Command-V) keyboard commands. (You must select text in the text entry area for the keyboard commands to work. To replace a selected text object's font, choose a new font from the font menu or from the Fonts panel. When you click outside of the window and return to the Main Window, the original font will be replaced by the new font. You can also change fonts using the Font menu or Fonts panel in the Main window. Text Objects with Fixed Point Sizes If you select the Text tool and immediately click the mouse within the main window, instead of growing a text box, TypeStyler will open the Text entry window where, using the Fonts floater you can select the font and point size and enter text. When you click outside, TypeStyler displays your text in the upper left corner of the main window, using the point size and font selected. Even when a text object is created at a specific point size, TypeStyler still creates an imaginary bounding box which just encloses the object. If the text object is then modified in some way, TypeStyler resizes the object accordingly to fit into the dimensions of that imaginary box. This can result in the point size of the object increasing or decreasing. In order to ensure that the specified point size is maintained in the modified text object, the user must ensure that the Point Size button is reselected every time the shape of the object is changed. Any text object, whether originally created at a specific size or sized to fit a text box, may be resized to a specific point size at any time. To duplicate a text object: 1. Click the object you want to duplicate so that it is selected. 2. Select Duplicate from the Edit menu, or type Command-D. When you use the Duplicate command the duplicated object will be just offset from the original. 3. Press and hold the Option key, then click on the object and drag. To copy and paste a text object: 1. Click the object you want to copy so that it is selected. 2. Select Copy from the Edit menu, or type Command-C. 3. Select Paste from the Edit Menu, or type Command-V. When you paste the object it will be directly over the original object. |