| TypeStyler's Path Tools TypeStyler provides you with a set of tools which allow you to create and edit paths. A path is any line or segment which joins two anchor points. Anchor points define where each segment of a path begins and ends. Segments can be either straight or curved. A curve segment is called a Bezier Curve. A Bezier curve consists of two anchor points connected by a curve segment, with at least one direction point and direction line attached to each anchor point. Selecting the Pen tool allows you to create precise curved and straight line segments connected by anchor points. When you click on your document page with the Pen tool, you will create corner points and straight line segments with no direction lines. Clicking and dragging them will create smooth curve points and curve segments with direction lines. The Pen tool requires patience and practice to become comfortable using it. If you find that the Pen tool is too difficult to use, you may be more comfortable using the features in Chapter 6, "TypeStyler Path Magic". The Path Magic tools allow you to create many variations on path shapes without editing the individual points. Creating a continuous curve using the Pen tool: 1. Chose the Pen tool. 2. Click and drag to create the first anchor point. The angle of the pair of direction lines that you create will be determined by the direction you drag. 3. Release the mouse button and move it away from the last anchor point, then click and drag in the direction you want the curve to go to create the second anchor point. A curve segment will connect the first and second anchor points, and a second pair of direction lines will be created. The shape of the curve segment will be defined by the length and direction you drag the mouse. Don't worry if the curve is not exactly how you want it, you can always reshape the curves later. 4. Now Drag to create additional direction lines. The anchor points will be connected by curve segments. 5. To complete the object as an open path click on the Pen tool on the Tool palette or click on the Pointer tool. To complete the path as a closed path, position the Pen tool over the starting point then click and release the mouse. Once the path is closed the object is filled solid. To change this setting you enter the Style Workshop use the Fill Kind radio button in the Main tab settings. 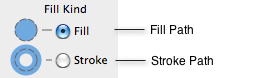 • The fewer the anchor points, the smoother the shape. Too many anchor points will produce bumpy curves. Using TypeStyler's other path editing tools will allow you to move anchor points or path segments to reshape a path on either text objects converted to outlines or on panel shapes converted to outlines. The Direct Selection tool is used to select one or more anchor points or segments of a path. Clicking on the edge of an object with the Direct Selection tool will only select that segment, and the segment's direction lines and direction points will become visible. (Lines created with the Line tool don't have direction lines, they only have anchor points.) To select anchor points or segments: 1. Choose the Direct Selection tool. 2. Click on the anchor point(s) or segment(s) or position the pointer outside the object you want to select, then click and drag the pointer around the points or segments you want to select (a dotted marquee will define the area as you drag over it). Only the points within the marquee are selected. IMAGE: selecting_points.png 3. You can also hold down the shift key and click to select or deselect additional points. • Pressing the Command key while using the Direct Selection tool will change the pointer to the Pointer tool until the key is released. This can be useful for moving objects without changing tools from the tool palette. The Add Anchor Point tool lets you add an additional anchor point to an existing path. To add an additional anchor point, click on the path with the Add Anchor Point tool where you would like the new point to appear. Adding a new anchor point on a curve segment will add direction lines, leaving the curve unchanged. Adding an anchor point on a straight line segment will create a corner anchor point. To add anchor points to path: 1. Select the object you are to work on. Hint: Choose Quick View from the view menu to make it easier to see the points. 2. Choose the Add Anchor Point tool from the tool palette by clicking on the Pen tool to bring up the expanded palette. 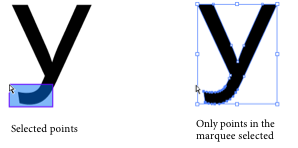 .
3. Click on the edge of the object. A new, selected anchor point will appear. Repeat this as necessary. • If you are not directly on the path a point will not be added. • Holding down the Command key will change the tool to the Direct Selection tool. The Remove Anchor Point tool lets you remove anchor points to change the shape of the path or remove anchor points to reduce the complexity of an existing path. Selecting the Remove Anchor Point tool and clicking on a point removes the anchor point without creating a break in the path. A new segment is drawn between the two points on either side of the removed anchor point. To remove anchor points to path: 1. Select the object you are to work on. Hint: Choose Quick View from the view menu to make it easier to see the points. 2. Choose the Remove Anchor Point tool from the tool palette by clicking on the Pen tool to bring up the expanded palette. 3. Click on an anchor point. The point will be deleted and an adjacent point will become selected. Repeat to delete other anchor point, if necessary. The Convert Anchor Point tool will change a curve anchor point to a corner anchor point and a corner anchor point to a curve anchor point. To add direction lines to an anchor point, click and drag on the point with the Convert Anchor Point tool. To remove direction lines, click on the point with the Convert Anchor Point tool. To reshape or convert an anchor point to a curve: 1. Select the object you are to work on. Hint: Choose Quick View from the view menu to make it easier to see the points. 2. Choose the Convert Anchor Point tool from the tool palette by clicking on the Pen tool to bring up the expanded palette. 3. Click and hold on the anchor point, then drag the anchor point. As you do this direction lines will be created as you drag. 4. To further modify the curve choose the Direct Selection tool and drag the anchor point or a direction line. You can temporarily change the Convert Anchor Point tool to the Direct Selection tool by holding down the Command key. • Direction lines on a smooth curve form a straight line in relation to each other even if one of the direction lines is moved or the curve segment or anchor point they are connected to is moved. • If the curve segment you're working on twists around the anchor point as you drag, keep the mouse button pressed down, then rotate the direction line back around the anchor point to undo the twist, then continue to drag in the new direction. The Scissors tool is used to split or break a path at either an anchor point or in the middle of a segment. Use the Selection tool and click on the object to display it‚Äôs anchor points. Choose the Scissors tool and click on the object‚Äôs path. Clicking on closed path will result in a single open path and clicking on an open path will split it into two paths. To split a path: 1. Select the object you are to work on. Hint: Choose Quick View from the view menu to make it easier to see the points. 2. Choose the Scissors tool from the tool palette. 3. Click on the object's path. If you click on a closed path it will turn into a single, open path. If you click on an open path, it will split into two paths. If you click on a segment, two new endpoints will appear, one top of another. 4. To move the new endpoints apart, choose the Direct Selection tool. 5. Click on the new endpoint, then drag it to uncover the endpoint underneath. The Line tool: The Line tool draws a straight line path between two points. Holding down the shift key as you drag the line tool constrains the drawn lines to 0-, 45-, and 90-degree angles. Lines can be styled similarly to Text and Panel objects. Lines can also be shaped using the bottom Shaper line of the Shaper tool. Points can also be added, subtracted, etc. using the Pen tools. |