| Manipulating Objects TypeStyler is designed to create page layouts with the size, number (and complexity) of text and panel. Object handling features common to drawing programs are included, so many document designs can be fully created in TypeStyler without the need to import work from other programs. All of the operations described in this section apply to panels as well as text objects. 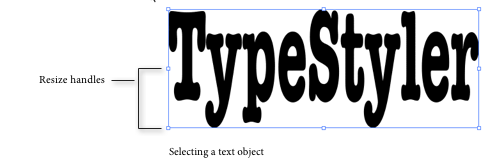 Selecting And Deselecting Objects Before you can work with an object, you have to select it in the Main Window. To select an object, activate the Pointer tool, then click once on the object. A frame with eight small blue squares, called handles, appears around the selected object. By holding down the Shift key when you select an object, you can select another object, or several objects for the same operation (see "Selecting Multiple Objects" below). Only selected objects will have handles. To deselect an object, click outside of the object on a blank part of the document or window. If you have several objects or objects that are layered in the main Window you'll find the Objects palette make selecting your desired object quite easy. To open the Objects palette click on Objects from the toolbar or select Object Palette... from the menu bar. Selecting the desired object within the Objects palette make it the active object in the Main Window. Resizing Objects You can resize an object by dragging out one of its four handles. The object will grow in that direction, scaled disproportionately larger or smaller. To constrain the object to its original dimensions, hold down the Shift key as you drag the handle, and the object will be scaled proportionately larger or smaller (all dimensions of the object will increase or decrease by the same amounts). Rotating Objects TypeStyler allows you to precisely rotate any text or panel object by a specified number of degrees . This capability is accessed through a dialog box that works in conjunction with the Rotate Tool described above. There are a couple ways to access precision rotation: 1. Through the Rotate... menu selection in the Object menu, a dialog box will appear. Enter the number of degrees by which you want to rotate the object. There are two radio buttons, Clockwise and Counter-Clockwise which allow you to select the direction of rotation. By default, Clockwise is selected. Once satisfied with the selection, click on OK or press the Enter key.The active text or panel object will be rotated around its center point.  2. By selecting the object you'd like to rotate and clicking on the Rotate Tool from the Tool palette. The text or panel object will be rotated around its center point as you move the mouse. Rotating Body text Objects In addition to rotating Body or Container text objects using the same methods as other TypeStyler objects you can also rotate the container shape without the text contained within rotating.  Moving Objects You can move an object by clicking the Pointer tool anywhere in the object--except the four handles--and dragging it to a new location. When using the Shaper tool, you can click-drag the Center Point Handle of circular objects to move them around your document. Duplicating Objects You can duplicate an object by first selecting it and then choosing Duplicate from the Edit menu (Command-D). The duplicate copy of the object appears right on top of the of the original object. You can select multiple objects and duplicate them as a group. You can also duplicate an object by dragging. This option works by pressing and holding the Option key and then clicking on your object and dragging. Flipping Options To access the Flip... dialog, ensure that the object to be flipped is the active object. Then select the Flip... option from the Object menu. The Flip... dialog will appear. Control of the flipping options is set by the three check boxes Horizontal, Vertical, and Shape Only. By turning these options on individually and in combination, six different flips can be achieved. The effect of a flip can be seen in the two graphic windows to the left of the radio buttons. The Original shape is a static image and gives a reference with which to compare the appearance of the Flipped shape. Clicking in either the Original or Flipped examples will display the next example. By repeatedly clicking in this way, all of the possible flips may be previewed. The six different flipping effects can be broken down into those flips which affect the object as a whole and those which affect the shape of the object only, with three possible combinations for each. Flips Which Affect Object as a Whole Horizontal - Flips entire object about a vertical axis Vertical - Flips entire object about a horizontal axis Horizontal - Flips entire object about both horizontal and Vertical vertical axes Flips Which Affect Shape Only Horizontal - Flips shape alone about vertical axis Vertical - Flips shape alone about horizontal axis Horizontal - Flips shape alone about both vertical and Vertical horizontal axes The Flip... dialog will not allow the Horizontal and Vertical check boxes to both be unchecked at the same time. If the Horizontal flip is selected but the Vertical flip is not, and then the Horizontal flip is turned off, the Vertical flip will automatically be checked. Circular Flips Circular objects are constructed differently than other objects, and the flipping options described above are not applicable. There is a separate Flip... dialog for circular object which appears in place of the standard Flip... dialog when the active object is circular: The operation of the Flip... dialog for circular objects is identical to that of the dialog for other objects, except that the flipping options are relevant to circular objects. In place of the Horizontal and Vertical options, the circular dialog has check boxes for flipping the Baseline and Direction. Baseline Exchanges the baseline and text height line Direction Toggles between concave and convex text Baseline and Exchanges baseline and text height line, and Direction flips direction of text In addition to the check boxes for selecting the flip, there are two radio buttons for selecting the location of the flip, By Area and By Center. By Area flips the object while keeping the original location. By Center flips the object about the center of the circle. Since these two buttons affect the location of the flip, and not the flip itself, their effect cannot be seen in the Flipped shape preview within the dialog box. Selecting Multiple Objects You can select more than one object at a time to move them around collectively or group them for other operations. There are two ways to select multiple objects. Method 1: 1. Using the Pointer tool, select the first object by clicking on it. 2. While pressing the shift key, click the other desired objects. All the objects you click will be selected. Method 2: Using the Pointer tool, select several objects by dragging the cursor marquee to enclose them. Any object that the marquee touches is selected. Selecting All Objects There are two ways you can select all the text and panel objects in a document: Method 1: Choose Select All from the Edit menu (Command-A). Method 2: 1. Click the Pointer tool. 2. Grow a cursor marquee to enclose all the objects. Deselecting Multiple Objects To deselect one of several selected objects, hold down the shift key and click each object you want to deselect. To deselect all selected objects, click outside any of the active objects, or choose Deselect All from the Edit menu (Shift-Command-A). Resizing Multiple Objects Resizing one of several selected objects will cause all selected objects to resize by the same proportion. Working with Object Layers When several objects are superimposed, they form a stack of objects, with each occupying its own layer. For example, an object could occupy the top, bottom, or fifth layer in a stack consisting of six objects. When you select objects, they retain their position in a stack. Selecting, restyling, moving, or reshaping an object does not affect its layer position. To change the order of object layers, you use commands located in the Object menu. Bring To Front: Selecting an object or group of objects and then choosing Bring To Front causes the selection to appear in front of all other objects. Send To Back: Selecting an object or group of objects and then choosing Send To Back causes the selection to appear in back (or behind) all other objects. Bring Forward Selecting an object or group of objects and then choosing Bring Forward causes the selection to move forward one level through the object layers. If you have five objects superimposed and the selected object is the fifth layer (all the way in the back), Bring Forward brings it forward to the fourth layer. Send Backward Selecting an object or group of objects and then choosing Send Backward causes the selection to move backward one level through the object layers. If you have five objects superimposed and the selected object is the first layer (all the way in the front), Send Backward brings it backward to the second layer. When you use any of the above four Object menu commands to change the ordering of objects and save the document, the new layer order is also saved. Grouping and Ungrouping Objects You can select several objects and treat them as one object by selecting Group from the Object menu. Grouping makes it easy to move several objects together, or resize them proportionately, and it is a good method of protecting the spatial relationships in finished work. Grouping does not change the order of the individual objects that are grouped; groupings can include single objects grouped together, single objects grouped with a group, or "nested" groups (groupings that include other groupings). Grouped objects remain grouped until you select Ungroup from the Object menu. You must select grouped objects before you can ungroup them. Grouping is saved with the document. When you reopen a document, objects retain their previous groupings. To group objects: 1. Select the objects to be grouped. 2. Choose Group from the Arrange menu (Command-G). To ungroup objects: 1. Select the object to be ungrouped. 2. Choose Ungroup (Command-U). Locking and Unlocking Objects You can lock objects so that they can't be selected. This is useful when objects overlap each other and you find yourself unintentionally selecting the wrong objects. You can lock the objects you don't want to select and continue working on the objects that are not locked. Locked objects do not lose their position in the stack of objects, and you can work on objects in layers beneath locked objects. Locking is saved with the document. If any objects were locked when you saved the document, they will still be locked when you reopen it. You unlock objects by selecting Unlock All from the Arrange menu. You cannot unlock objects individually. To lock objects: 1. Select the objects to be locked. 2. Choose Lock from the Object menu (Command-L). The selected objects are deselected and can not be selected again until Unlock All is selected. To unlock objects: Select Unlock All from the Object menu (Shift-Command-L). Hiding and Showing Objects Another method of removing objects from harm's way while you are working is to hide them. When a document begins to be cluttered with objects, hiding the inactive ones makes it easier to work on a selected object. Hidden objects can't be seen or selected. You hide objects by selecting them and then selecting Hide from the Arrange menu. You make hidden objects visible by selecting Show All from the Arrange menu. You cannot show individual hidden objects. Hidden objects won't print; you need to display them before printing. Also hiding is not saved with your document. When you reopen a document, all hidden objects are displayed. Choose Hiding when you want to shorten the time it takes to repaint complex objects, for example with adjustable shadows or graduated fills. To hide objects: 1. Select the object to hide. 2. To hide multiple objects, hold down the shift key and select the objects to be hidden. 3. Choose Hide from the Object menu (Command-H). To show all hidden objects: Select Show All from the Object menu (Shift-Command-H). Aligning Circular Text Objects TypeStyler offers you two ways to align circular text objects. In the View menu, "Snap to guides" can be used to align the centerpoints of objects. In the Edit menu, Copy Attributes and Paste Attributes can be used to align selected objects' centerpoints. Method 1: Align centerpoints to the intersection of two guides. This method applies to both text and panel objects. 1. Set one vertical guide and one horizontal guide. Their intersection locates the centerpoint. 2. Check Snap to guides in the View menu, if it isn't already on. 3. Create your circular objects. 4. For each circular object: A. Select it with the Pointer tool. B. Choose the Shaper tool. C. Grab the center point of the circular object with the X-cursor of the Shaper tool. D. Drag the circular object across the intersection of the guides and let the centerpoint of the object snap to this intersection. Method 2: Center Pasting Attributes. Copy Attributes and Paste Attributes "Center" will align multiple objects by their centerpoints (circular or non-circular objects, text or panel objects). This method simplifies aligning circular text with circular panels. Pasting Center makes easy work of creating concentric circular text objects. 1. Create your desired TypeStyler objects. 2. Select the object around whose center you want other objects to align themselves. 3. Choose Copy Attributes from the Edit menu (Option-Command-C). 4. Select the objects you want to align with the first object's centerpoint. 5. Choose Paste Attribute from the Edit menu (Option-Command-V). The Paste Attributes dialog box opens. 6. In the Paste Attributes dialog, select only the Center option, then Click OK. Alignment and Distribution Dialog The Alignment dialog lets you align selected objects relative to one another. Alignment or distribution can be vertical or horizontal, left, right, or centered. The Alignment dialog displays has a pull down menu for horizontal and vertical alignment and distribution choices. 1. To align, select two or more objects. To distribute three or more objects must be selected. 2. Choose Alignment from the Object menu. 3. Make your choice from the Horizontal and/or Vertical pull down menus. |