| Shader Fills TypeStyler's Shader effect is another fill type that allows you to choose from over a hundred included shader balls. Shader fills are great for giving your objects a simulated 3D effect. Shader fills work best on larger objects. 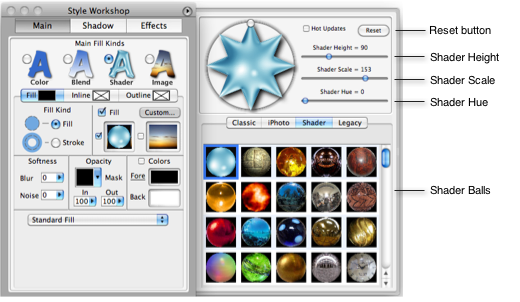 To apply a Shader fill make sure your object is selected and select the Shader radio button, your object will be filled with the default aqua shader effect. To choose one of the other Shader balls click on the "Custom" button. This opens a side drawer off of the Style Workshop. There are 4 tabs, choose the tab named "Shader." With the drawer open each Shader ball can be further customized by using the Shader Height, Shader Scale and Shader Hue sliders. The star that represents the selected Shader also acts as a lighting trackball. By clicking and dragging the star the lighting direction also changes. Clicking "Reset" resets the selected Shader back to its default settings. Under the heading "Fill Kind" there 2 choices. When Fill is selected, the object is filled with the current color or image that is selected. When Stroke is selected the object is outlined in the current color or image that is selected  The Softness area has 2 popup slider controls. The first one controls the Blur. Blur works by softening the hard edges of the object and to smooth out the transition between 2 colors. The Noise slider allows you to add interesting texture effects similar to that of a bad television signal.  Fill Opacity is used to set the overall transparency of the selected object. You can also add an Opacity Mask to your object by choosing one of the predefined opacity masks from the Mask palette or by using the either of the Fill Opacity sliders. The In and Out sliders control the object's transparency based on the values of black and white in the mask with white being visible and black being transparent. 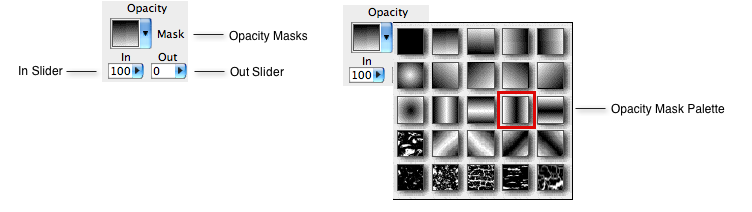 Outlines and Inlines Both outlines and inlines are drawn around the outside boundaries of the characters in an object. The inner line is called the Inline and the outer line is called the Outline. If you make them the same color, the result looks like a fat outline (this is also determined by the line weight; see “Line Width Slider” below). If you make them different colors, or patterns, you can create many effects. A white inline with a black outline, for example, can create a formal or classic look. If you only want a single line around a type character, you can use either an inline or an outline, and the result will look the same. To create either an Inline or Outline, select Inline or Outline and and make sure that Inline or Outline checkbox is checked. The same fill options are used for the main object, shadow, inline, and outline. The current inline or outline fill is displayed in the box next to Inline or Outline. The current fill color, image or pattern is highlighted in the appropriate palette. Unchecking either the Inline or Outline checkbox turns off the existing inline or outline. Note: Shadows with Three-D Block fills cannot be inlined or outlined. Use the Zoom Effect option to create block inline, outline effects. Line Width Slider  When either Inline or Outline are selected, a line width slider appears near the bottom of the Style Workshop. The line width slider gives you choices of line widths, ranging from a hairline (one point or pixel wide) to a line forty points thick. |