| The Character Tab Letter Spacing or Kerning and Tracking Letter Spacing lets you control the spacing of any or all the letters of your object. This is referred to as Kerning and Tracking. Kerning is the adjustment of space between a pair of characters where Tracking is the adjustment of space one or more characters. To Kern a pair of letters you need to be in edit mode. To do this select your text object and then Command - T (or any of the the other methods) to enter the Text entry window. Highlight the letter the you want the kerning to follow then use the Letter Spacing slider under the Character tab in the Typesetting floater. For example, if you had the word "Type" and wanted to kern between the T and the y highlight the T and then use the Letter Spacing slider. Click outside of theText entry widow to exit. 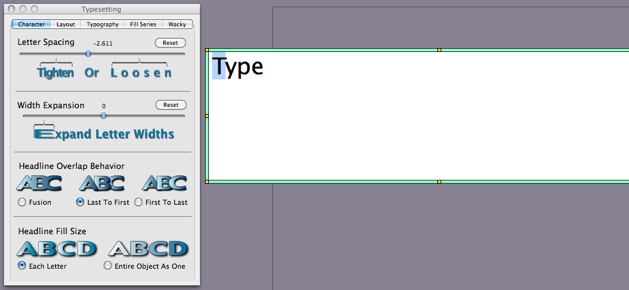 To adjust the Tracking of one or more letters you need to be in edit mode. To do this select your text object and then Command - T (or any of the the other methods) to enter the Text entry window. Highlight the letter the you want the kerning to follow then use the Letter Spacing slider under the Character tab in the Typesetting floater. For example, if you had the word "Headline" and wanted to increase the space between all the characters select and highlight all of them and then use the Letter Spacing slider. Click outside of theText entry widow to exit. Width Expansion The Width Expansion lets you expand the width of one or more characters in your Text object. To adjust the width of one or more letters you need to be in edit mode. To do this select your text object and then Command - T (or any of the the other methods) to enter the Text entry window. Highlight the letter the you want the kerning to follow then use the Letter Spacing slider under the Character tab in the Typesetting floater. For example, if you had the word "Expand" and wanted to increase the width letter "E" select and highlight just the "E" and then use the Width Expansion slider. Click outside of theText entry widow to exit. 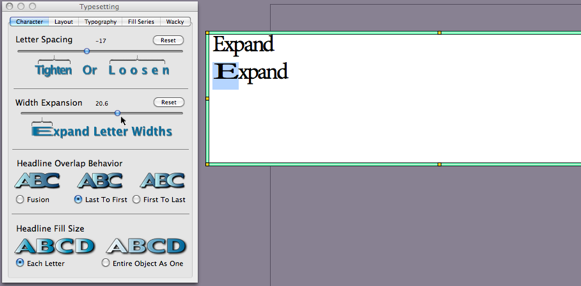 Headline Overlap Behavior Letter Fusion Letter Fusion turns the individual letters within an object into a single "fused" object, so that styling effects are applied across the entire object as a whole, instead of each individual letter.This capability allows for new styling effects. With Letter Fusion, color ramps can now be applied across an entire object, instead of character by character, as in the following example:  Letter Fusion also works with multi-line test objects, as the following example shows: 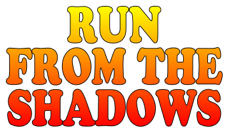 Finally, Letter Fusion enables you to create images that use case contouring. This is where a contour line encircles an entire word, as opposed to each individual character in the word. Case contouring merges the outlines of adjacent characters, provided that the outlines are close enough to overlap one another. Here is an example of this effect:  Letter Fusion is applied on a per-object basis, so you can have objects with and without Letter Fusion in the same document. Letter Fusion can be applied to an object at the time of its initial creation, or at any time thereafter. Drawing Order Characters in a text object that have been tightly kerned or negatively letter-spaced may touch or overlap, and even when the characters themselves do not touch, their shadows may overlap. This can be a major consideration in a graphic design. You can choose the direction of the overlap by setting the Drawing Order, which determines whether the overlap occurs right-to-left, or left-to-right.  You click either the Last to First or the First to Last Drawing Order button to change the drawing order. |